This article uses React 15 with React Router 4 and Redux 3 and assumes knowledge of all three. However the concepts explained here can be applied in any framework or library of your choice.
Go to my Github profile for a working accessibly routed example. We will explore this example app further in this article.
As a developer of Single Page Applications or SPA’s, no one needs to tell you how important the router of the application is. It translate the browser address into related pages and also allows the user to navigate to various pages or views in our application. In a sense, the router can be seen as the heart of our applications.
But, did you know, that quite a large number users out there often can’t see that navigation from one page to another has taken place?
Surprised? I can’t blame you, I mean what can be a more clear change in an application’s state than a navigation from one page to the next??!!
So let’s look at a very basic routed application created in React with the latest current version of React Router, namely v4.0.
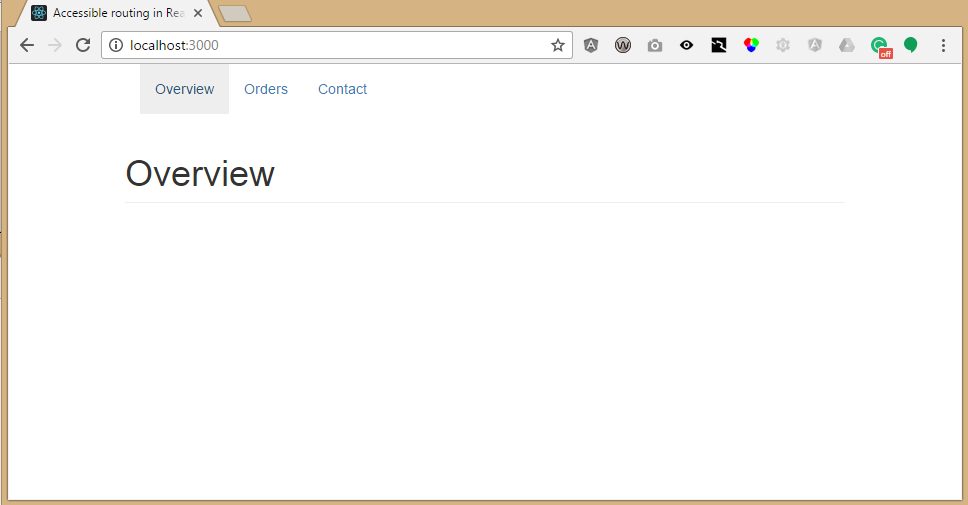
And before we dive into the code let’s meet a group of users who will have a lot of trouble using this specific application. These are users with visual disabilities.
Users who cannot see well enough to use browsers the way the rest of us do make use of Assistive Technologies called Screen Readers. These are pieces of software that can read back what we normally see on the screen with synthesized voices. This large group of users depend on the audible version of the websites we make to enjoy the same benefit that other users do.
Screen readers are clever enough to read a lot of information that the browser expose naturally, but if no information exists to read out, the screen reader will remain ominously silent, even if something very important has happened on screen.
Unfortunately, this is the case with many routed SPA applications today. Screen readers are able to recognise actual browser navigation very easily as the browser will tell the screen reader that it has navigated to another web page. In the case of SPA’s, like those built with React or Angular, the router software will take over some of the navigation actions from the browser in order to control the application without constantly reloading the host HTML page.
The result: A totally silent page transition leading to a very confusing experience for these users. Imagine trying to navigate a web application if you could not even see that the navigation was successful!
You can try this yourself as many screen readers are readily and even freely available. If you are viewing this page on a Mac, you already have a screen reader called VoiceOver installed. Head over to Deque University to see how to use the VoiceOver screen reader. For those on Windows, go grab the NVDA screen reader and then head over to Deque University to see how to use the NVDA screen reader.
In the example app you can simulate the standard behaviour by removing the A11yMessage component from the main app component.
The silence of the screen readers
The NVDA screen reader has a neat text to speech mode which I will use to demonstrate what the screen reader would say if I were to navigate our application above with a vanilla router implementation.
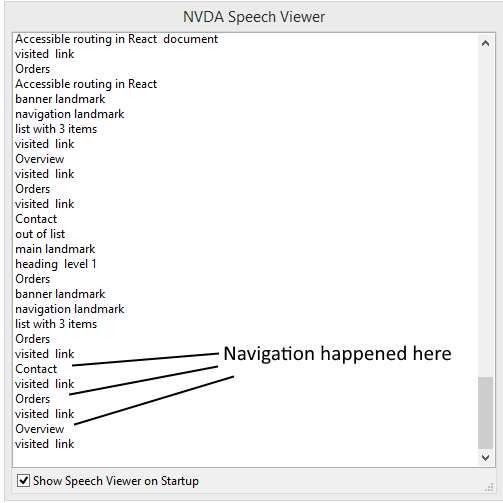
As we can see, the screen reader had no problems recognising our navigation links of Overview, Orders and Contact. It sees that these are in fact HTML link elements and also that we have visited them before. However, the actual navigation actions did not trigger any response from our screen reader.
This is nowhere near good enough. Not if we want everyone to be able to use our applications. We are looking for a solution that will open the doors for millions more potential users to use our application. We are also looking for an easy solution, because making websites that everyone can use is easier than you may think!
We find our solution in the beautiful marriage between React, Redux and React Router.
NOTE: This is not unique to using routing in React and as the solution comes from using HTML itself, it will also work in the framework or library of your choice after adapting it. It is also important to mention that this is not an issue with React Router itself, as our technology stack gives us all the tools we need to implement a solution. The router can’t, for example, automagically figure out the exact text we would want to show for each transition.
Setting up our application
Lets set up a React and Redux application with React Router 4:
import React  from 'react';
import { createStore } from 'redux';
import { Provider } from 'react-redux';
import { BrowserRouter as Router, Route } from 'react-router-dom';
import Header from './Header';
import Overview from './Overview';
import Contact from './Contact';
import Orders from './Orders';
import rootReducer from './reducers';
import  '../node_modules/bootstrap/dist/css/bootstrap.css';

//The Redux store is created as usual, but we add
//extra configuration to enable the use of the Redux browser dev tools.
//This extra configuration is entirely optional.
const store = createStore(rootReducer,
    window.__REDUX_DEVTOOLS_EXTENSION__ &&
    window.__REDUX_DEVTOOLS_EXTENSION__());

const App = () => (
    <Provider store={store}>
        <div>
            <Router>
                <div>
                    <Header/>
                    <main className="container">
                        <Route exact={true} path="/" component={Overview}/>
                        <Route path="/orders" component={Orders}/>
                        <Route path="/contact" component={Contact}/>
                    </main>
                </div>
            </Router>
        </div>
    </Provider>
);

export default App;
So, now we have an application that can navigate to three routes, is properly connected to Redux and uses Bootstrap CSS for some style. The use of Bootstrap is entirely optional and not required for this solution to work
How can we get our application to tell screen readers when a new page has been loaded by the router? As it turns out, we find our solution in HTML itself.
The magic of ARIA live regions
As it turns out, making accessible web pages is far from new. Much thought has gone into it by the folks who write the HTML specifications and those who build the browsers we use. And therefore the Web Accessibility Initiative - Accessible Rich Internet Applications or WAI-ARIA recommendation was created by the WC3. You can read about it on the WAI-ARIA recommendation page. To go through the entire document falls way way WAY WAY WAY beyond the scope of this article. But we will make use of ARIA live regions.
Basically, these HTML attributes allow us to communicate directly with screen readers. Pretty cool, don’t your think?
An ARIA live region is a part of your HTML that will notify screen readers of changes in the content of the HTML.
In short, to solve our problem we need put the following HTML somewhere on our page:
 <div role="status"
      aria-live="polite"
      aria-atomic="true">
   **Notification messages goes here**
 </div>
The role attribute tells the screen reader that this element is used to indicate some important status updates. Subsequently the aria-live attribute is used with polite setting. We need both to ensure maximum compatibility with the screen readers out there. Finally the aria-atomic attribute is set to true to indicate to screen readers that they have to read out the entire content of the wrapping div. These attributes also accept other values but these can be found in the ARIA documentation mentioned above.
NOTE: Using role=”status” or aria-live=”polite” will tell the screen reader that these messages are not warnings that should interrupt everything else that the screen reader may be reading out at that moment. Once the current reading task of the screen reader completes, these changes will be read out and that is perfectly fine for our navigation notifications. This provides a way better experience if you are not dealing with high priority messages.
Giving the silent a voice
Now that we know how to solve the problem, we will look at how we implement it in our React application. The ideal situation would be to have only one ARIA Live notifications container in our entire application where other components can inject messages like these into.
The clear best way to do this in any application of reasonable size and complexity is to use something like Redux. This allows us to easily set the message from anywhere in the application while we can have one Redux connected component that will communicate our messages to the screen readers.
This means we need an action that will set the message:
export const SET_A11Y_MESSAGE = 'SET_A11Y_MESSAGE';

export const setA11yMessage = (message) => ({
    type: SET_A11Y_MESSAGE,
    message
});
And a reducer to add the accessibility (or a11y) message to the Redux store state.:
const a11yData = (state={}, action) => {
    switch(action.type){
        case actions.SET_A11Y_MESSAGE:
            return Object.assign({}, state, {a11yMessage: action.message});
        default:
            return state;
    }
};
Now we are all set to update the message from anywhere in the application. We will update the message after each router navigation, therefore when each routed component is mounted.
The Orders component serves as example. The other components handle it in exactly the same way:
import React, { Component } from 'react';
import { connect } from 'react-redux';
import * as actions from './actions';

class Orders extends Component {

    componentDidMount() {
        this.props.setA11yMessage('Navigated to orders page.')
    }

    render() {
        return (
            <section>
                <h1 className="page-header">Orders</h1>
            </section>
        );
    }
}

export default connect(null, actions)(Orders);
As the main routed component often needs lifecycle hooks anyways, this is a very quick and easy addition.
Now we have our transitions all set up and ready to tell the screen readers all about what happened. So we implement a component that we can drop into our app:
import React, {Component} from 'react';
import { connect } from 'react-redux';
import { getA11yMessage } from './reducers';
import * as actions from './actions';

class A11yMessage extends Component {

    constructor(props){
        super(props);

        this.state = {
            currentA11yMessage: ''
        }
    }

    componentWillReceiveProps(nextProps){
        //We delay the setting and clearing of the accessible route transition
        //text to ensure that the screen readers don't miss it.
        if(nextProps.a11yMessage){
            setTimeout(()=>{this.setState({
                currentA11yMessage: nextProps.a11yMessage
            })}, 50);
            setTimeout(()=>{this.setState({
                currentA11yMessage: ''
            })}, 500)
        }
    }

    render() {
        const { currentA11yMessage } = this.state;
        return (
            <div className="sr-only"
                 role="status"
                 aria-live="polite"
                 aria-atomic="true">
                {currentA11yMessage ? <span>{currentA11yMessage}</span> : ''}
            </div>
        );
    }
}

const mapStateToA11yProps = (state) => ({
    a11yMessage: getA11yMessage(state)
});

export default connect(mapStateToA11yProps, actions)(A11yMessage);
And hey bingo, our component reacts to any changes to the accessible message in the Redux store.
So why all the timeouts? If we implement this component by directly displaying the change from Redux, we will see that in some of the most important browser-screen reader combinations this message is still not read out. It seems to get ‘lost’ in all the other updates happening during such a transition. Hey a lot of HTML needs to be updated! But if we put a slight delay on the setting of the message in the component, and subsequently clearing it again, it works as expected.
We are not done yet!
We also only want screen readers to see this text and we do not want unnecessary text noise visible on the pages for sighted users. So, in this component, we add the sr-only class from Bootstrap to the div in question.
This class is implemented in Bootstrap as follows:
.sr-only {
  position: absolute;
  width: 1px;
  height: 1px;
  padding: 0;
  margin: -1px;
  overflow: hidden;
  clip: rect(0, 0, 0, 0);
  border: 0;
}
This is one of the ways in which you can use CSS to visually hide content without totally removing it from the page. If we had used display: “none” on our element, if would also have been invisible to screen readers. This feature is not unique to Bootstrap, so you can either use this CSS directly in applications without Bootstrap or implement your own solution. Have a look at how to create invisible page content at WebAim for more information.
All we still need to do is drop this into our application. We only need to do that once, and I recommend doing that outside your router and pretty high up in your application, to ensure that this element always stays rendered in your application’s lifecycle:
const App = () => (
    <Provider store={store}>
        <div>
            <A11yMessage/>
            <Router>
                <div>
                    <Header/>
                    <main className="container">
                        <Route exact={true} path="/" component={Overview}/>
                        <Route path="/orders" component={Orders}/>
                        <Route path="/contact" component={Contact}/>
                    </main>
                </div>
            </Router>
        </div>
    </Provider>
);
And there we have it! Now we can very easily provide accessible information on each and every page transition. But not only that, this container can now be used for any extra accessible notification we want to tell the screen readers about!
But before we wrap this up, let’s have another look at the text-to-speech transcript of NVDA with our newly implemented accessible message:
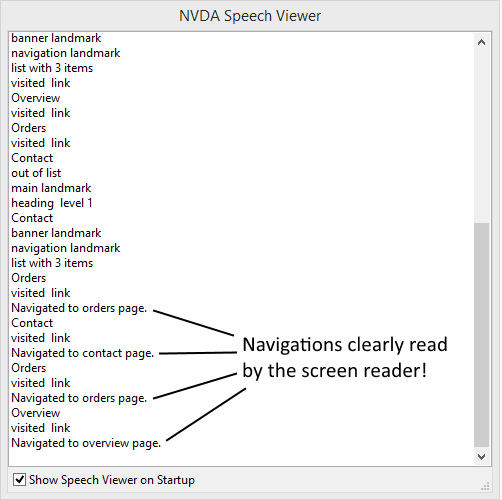
We now have an application that will no longer leave many of our potential users with no clear idea of what has just happened when they use the oh-so-important main application navigation links! And that is something to be very happy about!
As a final note it is worth mentioning that, although this is a very simple application, the technique can be used in an application of any size. Typically you will also want to do some work to tell the screen reader which navigation link is currently selected. The actual page title set in the HTML should also clearly reflect what has just happened. However, these features were not added to our demo application for the sake of simplicity.
You may also want to tweak the timeout settings or implementation thereof if you are sending a lot of concurrent message updates. However when we keep in mind that the screen readers will be reading it all out, it is usually a good idea to keep these messages short and to the point, in which case you should not have a problem. Test any changes you make with multiple screen readers first.