This article is compatible with React 15.6 and above.
TLDR;
Ever since my previous article on adding screen reader friendly transition notification to a React application that uses React Router 4, I have been looking for was to simplify the solution. What bothered me most was that the solution depended on introducing Redux into the application, which should not be a prerequisite for an ARIA live solution.
After getting some inspiration from the awesome folks at Deque and their nga11y library and also conquering my fear of using the React Context api, I came up with a solution that I felt was pretty good.
The functionality described in this article has been published on NPM as react-aria-live.
Why do I need this?
Perhaps we should quickly revisit the reason for adding ARIA live regions to your applications.
In JavaScript applications, like those we create in React, we often find very important changes happening in the application which are then completely ignored by screen readers. This happens because we are manipulating the HTML DOM with JavasScript and screen readers are not built to look for these changes or to try and figure out which ones to announce, but rather to read out the HTML the user is currently focusing on.
Examples of such changes include loading new routed views or updating import parts of the interface after we have fetched data from the server. Visual users can see this quite easily, but screen readers users need to be told by the screen reader software that something important has changed in the application.
To fix this, we can create ARIA live regions in our applications that, if found by a screen reader, will be monitored and any changes to the content will be announced to the user.
These regions are simply HTML tags decorated with the ARIA property of aria-live. Here is an example of how we could configure such a region:
<div aria-live="polite"
     aria-atomic="true"
     aria-relevant="additions">
        **Notification messages goes here**
</div>
The aria-live attribute tells screen readers that they should take note of this block. We normally use this with the polite setting as this will be sufficient to notify users without being too invasive and override the screen reader’s responses from their other actions.
The aria-relevant attribute tells screen readers which changes in this <div> should be read out and in this case we are looking for the addition of nodes inside the <div>.
Finally the aria-atomic attribute is set to true to indicate to screen readers that they have to read out the entire content of the wrapping <div> on every change.
The purpose of the article is not to teach about ARIA live regions, but rather on how to implement it in your React applications, so if you are super confused at this stage, please backtrack and read the reference at the start of this section before proceeding.
Making ARIA live regions play nice with React
One of the most important things to keep in mind when making use of an ARIA live region is that changes to the content will only be read out by screen readers if the entire region already exists in the DOM and there has been any changes.
This means we cannot render the live region in the DOM for the first time at the moment we want to dispatch a message to the screen reader. No, on the initial render the inside text is typically ignored by screen readers.
And here comes the caveat in a React application; we need to ensure that the live region is already rendered when we send our first message and that it stays rendered until we no longer require it.
In a React application it means that the live region needs to exist as high up in the component tree as possible and then we can use the same region for all communication.
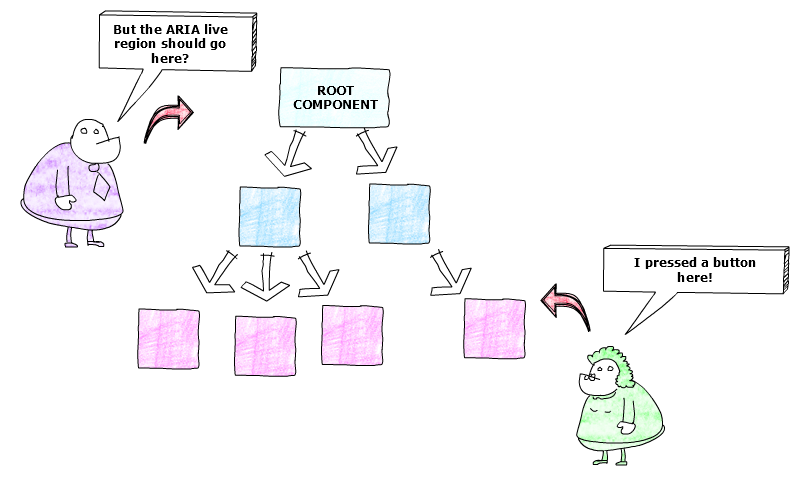
However, communication from a child component far down in the tree to the top parent represents a challenge in React. And for this reason I chose Redux as solution in my previous article. But we can use the very same api that the react-redux implementation uses to solve our problem and that is the React Context api.
We quickly see that the documentation strongly discourages the use of this api and that is true, this is not something you want to use often, unless the situation calls for it!
We will soon see how we can use this to solve out communication problem, but first..
Making ARIA live regions play nice with screen readers
Rendering issues are not the only reason we would want to use only one stable live region in our application. It also leads to cleaner, less complex code. And that is a win, win if ever I saw one!
However, when we do this, we could sometimes have multiple changes to the region content happening in a short space of time. This can cause issues for some screen readers and may cause some of the messages to be swallowed and not read.
To solve this we borrow from nga11y. If we duplicate the live region and alternate changes between the two regions, it fixes this problem.
Building our live region
Let’s start by creating an ARIA live block component:
import PropTypes from 'prop-types';
import React from 'react';

const offScreenStyle = {
  border: 0,
  clip: 'rect(0 0 0 0)',
  height: '1px',
  margin: '-1px',
  overflow: 'hidden',
  padding: 0,
  width: '1px',
  position: 'absolute',
};

const MessageBlock = ({ message, 'aria-live': ariaLive }) =>
  <div
    style={offScreenStyle}
    role="log"
    aria-live={ariaLive}
    aria-relevant="additions"
    aria-atomic="true">
    {message ? message : ''}
  </div>;

MessageBlock.propTypes = {
  message: PropTypes.string.isRequired,
  'aria-live': PropTypes.string.isRequired,
};

export default MessageBlock;
We create a component that can accept a message text and also the aria-live level setting. Our <div> also has a role of log.
Very importantly, we certainly do not want to visually render the live region, but we cannot hide it either so we apply a visually hidden style to it, right in the component!
Now we can use these regions in a messaging component. We know that we need two blocks per aria-live level and we will cater for both polite and assertive.
import PropTypes from 'prop-types';
import React, { Component } from 'react';
import MessageBlock from './MessageBlock';

class Announcer extends Component {
  state = {
    assertiveMessage1: '',
    assertiveMessage2: '',
    politeMessage1: '',
    politeMessage2: '',
  };

  setAlternatePolite = false;
  setAlternateAssertive = false;

  static propTypes = {
    politeMessage: PropTypes.string,
    assertiveMessage: PropTypes.string,
  };

  componentWillReceiveProps(nextProps) {
    const {
      politeMessage: oldPolitemessage,
      assertiveMessage: oldAssertiveMessage,
    } = this.props;
    const { politeMessage, assertiveMessage } = nextProps;

    if (oldPolitemessage !== politeMessage) {
      this.setState({
        politeMessage1: this.setAlternatePolite ? '' : politeMessage,
        politeMessage2: this.setAlternatePolite ? politeMessage : '',
      });
      this.setAlternatePolite = !this.setAlternatePolite;
    }

    if (oldAssertiveMessage !== assertiveMessage) {
      this.setState({
        assertiveMessage1: this.setAlternateAssertive ? '' : assertiveMessage,
        assertiveMessage2: this.setAlternateAssertive ? assertiveMessage : '',
      });
      this.setAlternateAssertive = !this.setAlternateAssertive;
    }
  }

  render() {
    const {
      assertiveMessage1,
      assertiveMessage2,
      politeMessage1,
      politeMessage2,
    } = this.state;
    return (
      <div>
        <MessageBlock aria-live="assertive" message={assertiveMessage1} />
        <MessageBlock aria-live="assertive" message={assertiveMessage2} />
        <MessageBlock aria-live="polite" message={politeMessage1} />
        <MessageBlock aria-live="polite" message={politeMessage2} />
      </div>
    );
  }
}

export default Announcer;
We have imported our message block component and used this to create the four live regions we require. Our component exposes a polite message and an assertive message. When these props change, it will alternate the rendering into the related message block components, while clearing the previous ones used.
This is now ready to be used, so let’s go and see how we can put this right at the top of our app!
Putting it into context
The React Context api allow us to provide a communications interface from a parent component that can be accessed by ANY child component in its subtree.
We will not expose the messages as variables from the parent component, rather we will create messaging functions that will be available to the child components. If you do not know why I made this choice please carefully read the above resource completely!
As context only works along parent-child lines AND we want to render the live region high up in our app, let’s go and create a component we can wrap our entire React app in!
import PropTypes from 'prop-types';
import React, { Component } from 'react';
import Announcer from './Announcer';

class LiveAnnouncer extends Component {
  constructor(props) {
    super(props);

    this.announcePolite = this.announcePolite.bind(this);
    this.announceAssertive = this.announceAssertive.bind(this);
  }

  state = {
    announcePoliteMessage: '',
    announceAssertiveMessage: '',
  };

  static childContextTypes = {
    announcePolite: PropTypes.func.isRequired,
    announceAssertive: PropTypes.func.isRequired,
  };

  getChildContext() {
    return {
      announcePolite: this.announcePolite,
      announceAssertive: this.announceAssertive,
    };
  }

  announcePolite(message) {
    this.setState({
      announcePoliteMessage: message,
    });
  }
  announceAssertive(message) {
    this.setState({
      announceAssertiveMessage: message,
    });
  }

  render() {
    const { announcePoliteMessage, announceAssertiveMessage } = this.state;
    return (
      <div>
        <Announcer
          assertiveMessage={announceAssertiveMessage}
          politeMessage={announcePoliteMessage}
        />
        {this.props.children}
      </div>
    );
  }
}

export default LiveAnnouncer;
Any component that implements context has to define the shape of the context, using the normal PropTypes interface, and also expose its context api to the child components by implementing the getChildContext function.
Our component exposes an announcePolite and announceAssertive function that any child component can use to send ARIA live messages!
BUT, due to the risks associated with using context it is best to abstract the implementation, so let’s wrap that inside another component that we can use anywhere in our application.
import PropTypes from 'prop-types';
import { Component } from 'react';

class LiveMessage extends Component {
  static propTypes = {
    message: PropTypes.string.isRequired,
    'aria-live': PropTypes.string.isRequired,
  };

  static contextTypes = {
    announcePolite: PropTypes.func.isRequired,
    announceAssertive: PropTypes.func.isRequired,
  };

  constructor(props) {
    super(props);

    this.announce = this.announce.bind(this);
  }

  componentDidMount() {
    this.announce();
  }

  componentDidUpdate(prevProps) {
    const { message } = this.props;
    if (message !== prevProps.message) {
      this.announce();
    }
  }

  announce() {
    const { message, 'aria-live': ariaLive } = this.props;
      if (ariaLive === 'assertive') {
        this.context.announceAssertive(message || '');
      }
      if (ariaLive === 'polite') {
        this.context.announcePolite(message || '');
      }
  }

  render() {
    return null;
  }
}

export default LiveMessage;
This component allows you to set the text to be announced as well as the aria-live level. It will transmit the message to screen readers either when it is mounted with a non empty text message or when the text message prop changes!
In order to fetch the the context from the getChildContext function of the parent, it needs to implement a matching contextTypes object.
We also see that it renders a null value as we do not want to render anything on screen with this component.
Now we have our fully function messaging system and we can use it (note that in the code below the imports are now done from the npm module after publish):
import React, { Component } from 'react';
import { LiveAnnouncer, LiveMessage } from 'react-aria-live';

class MyApp extends Component {
  state = {
    a11yMessage: '',
  };

  render() {
    return (
      <LiveAnnouncer>
        <LiveMessage message={this.state.a11yMessage} aria-live="polite" />
        <button
          onClick={() => {
            this.setState({ a11yMessage: 'Button Pressed' });
          }}>
          Press me
        </button>
      </LiveAnnouncer>
    );
  }
}

export default MyApp;
NOTE: The MyApp component is the component I will pass to ReactDOM to bootstrap my application. It is also important to note that whilst this is a short example for clarity sake, the LiveMessage component can be used in any child of LiveAnnouncer at any level!
The react-aria-live GitHub repository contains a functional example application you can also use if it is not clear how to put it all together.
And with that our problem has been solved. We can now easily transmit important messages from anywhere in our React applications, giving all users the same experience, without writing complex code in many of our components.